


Authenticate Gatsby with Auth0
Let’s talk about Gatsby. What’s not to love am I right?
My personal site is built with Gatsby and its great! With the announcement of Gatsby recipes, there’s even more to love. I recently went live on twitch and created an egghead video about how to add Auth0 into essentially any Gatsby website pain-free with a Gatsby recipe.
Gatsby Recipes
Working with any Gatsby website, the first thing we want to do is run:
gatsby recipesThis will pull up all of the available pre-created recipes you can use right away.
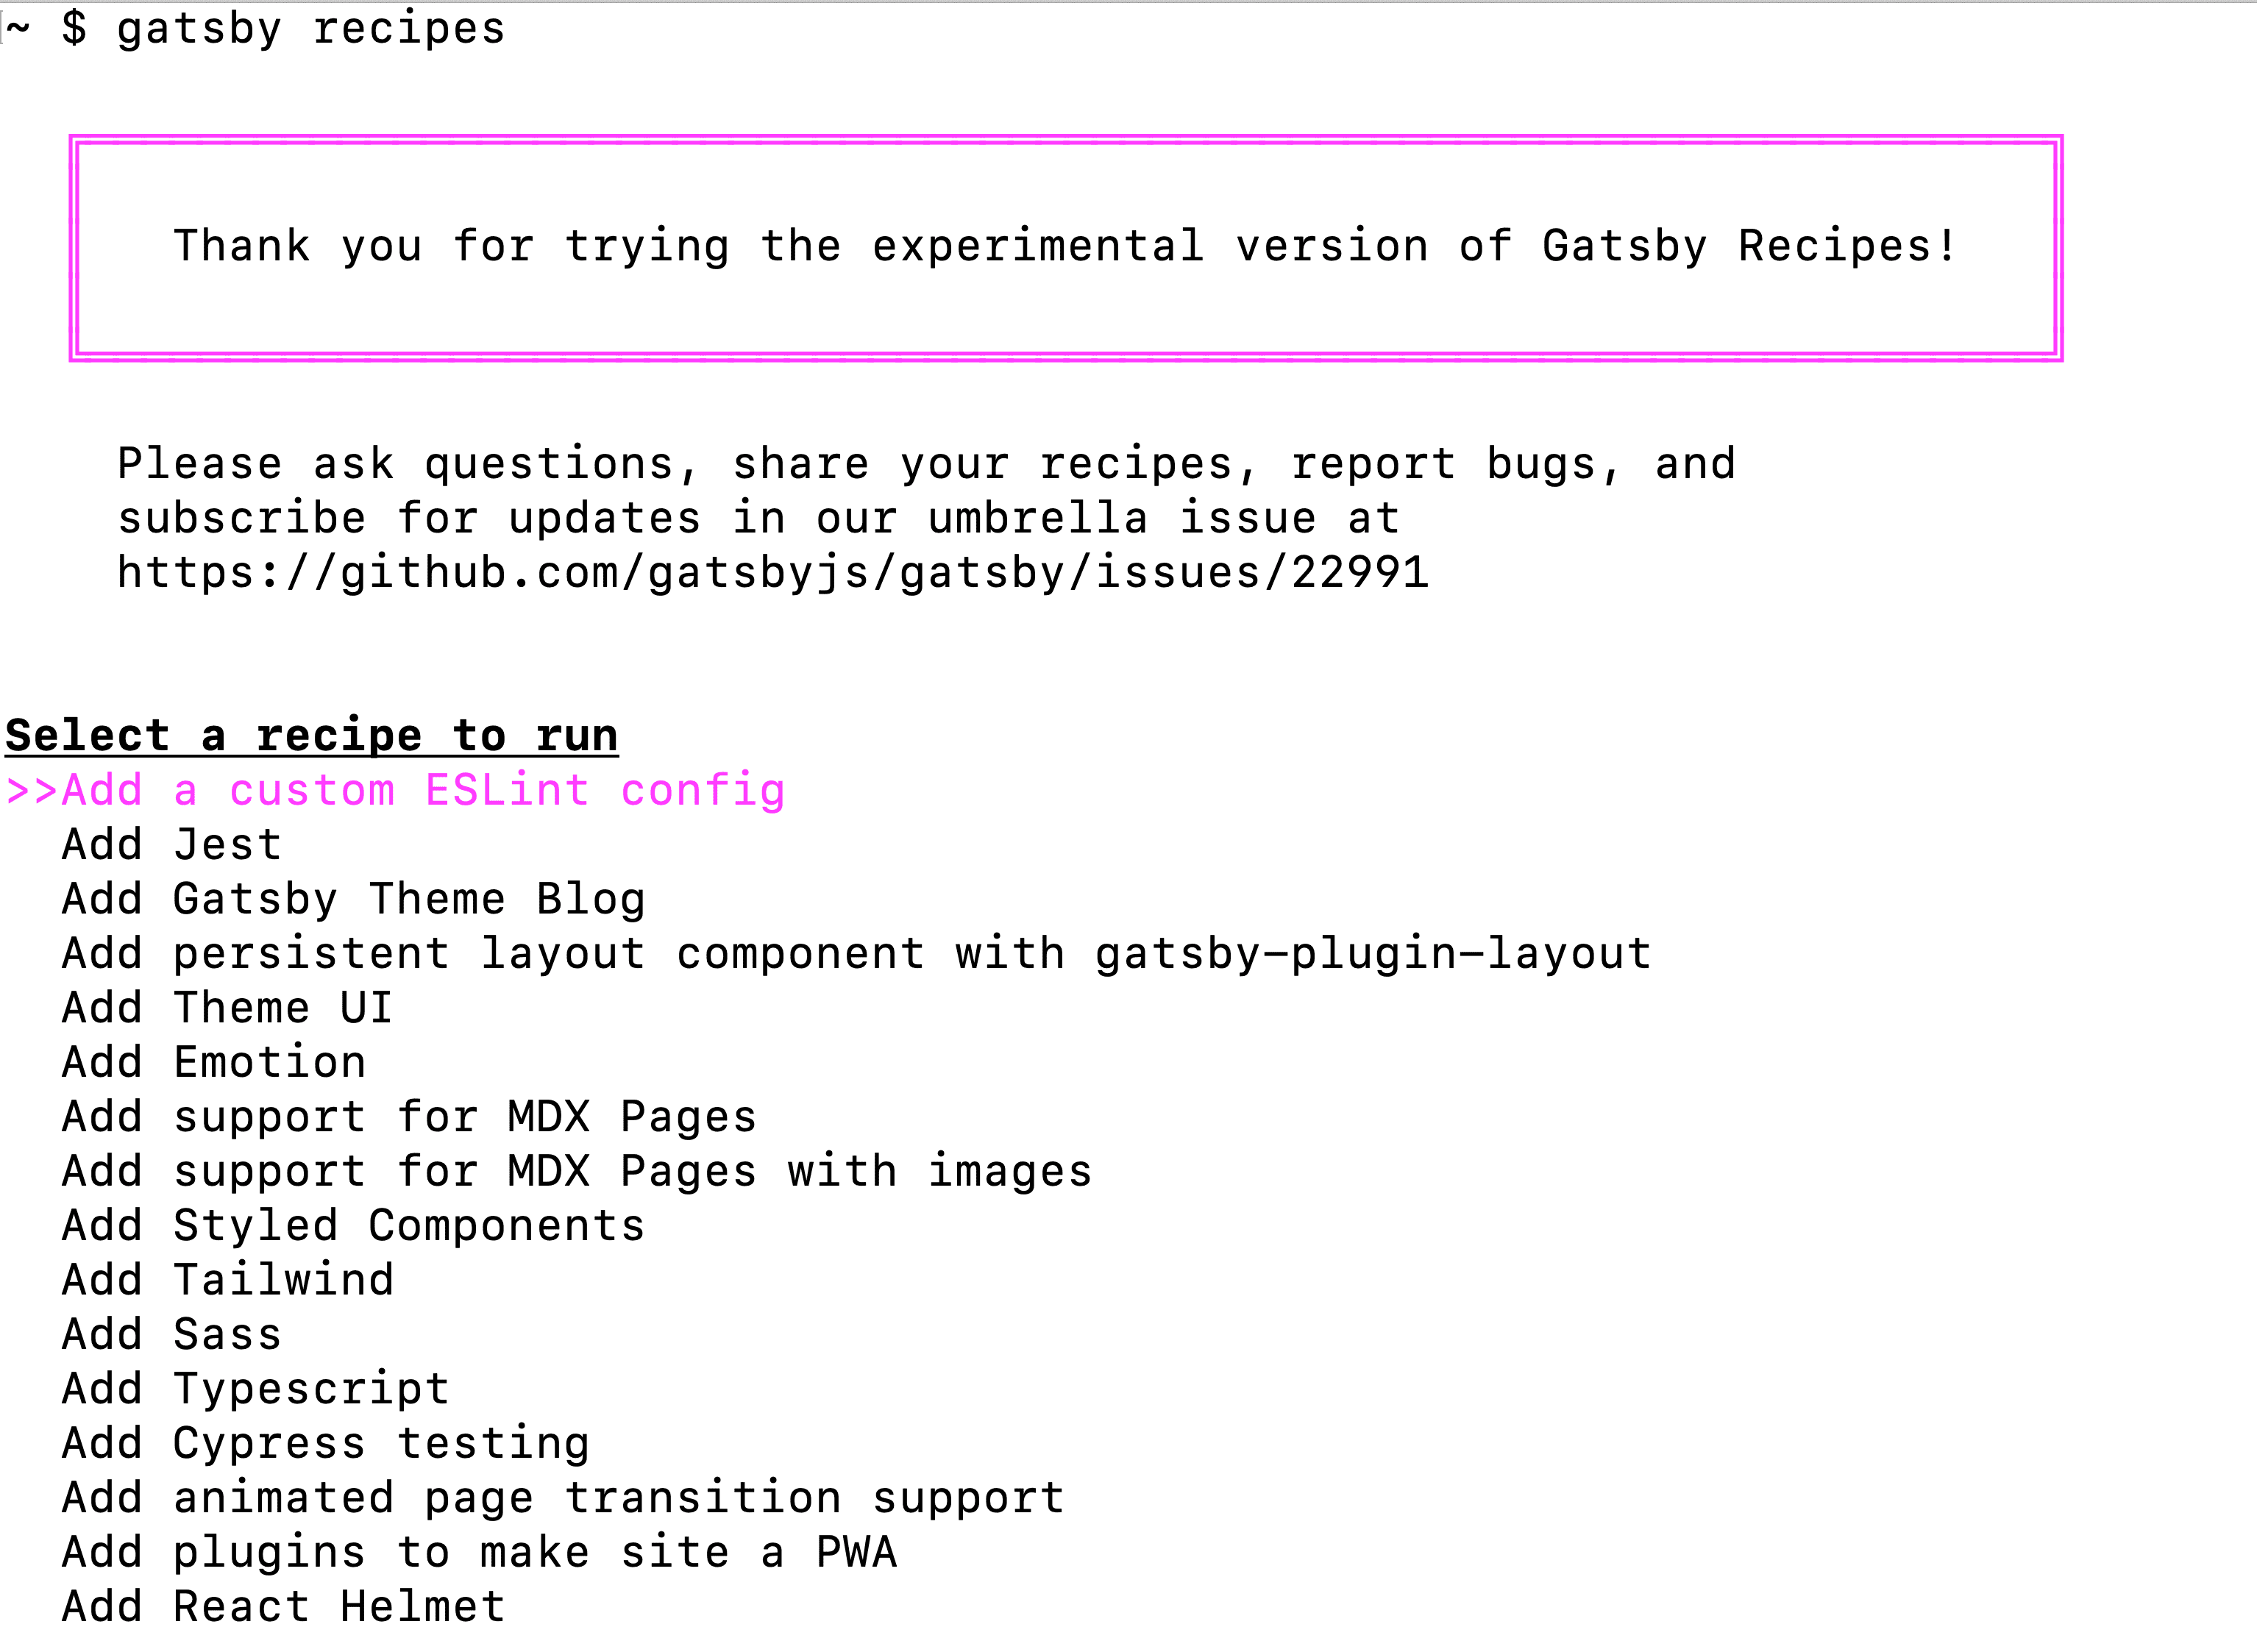
If you see an official Auth0 one, then go ahead and run that option. It’s not an option at the time I am writing this post, so instead you can use this gist to do the same thing:
gatsby recipes https://gist.githubusercontent.com/twclark0/0e11c962743f4e62ccd33a92d8b52d23/raw/dc830c5d64dc3aede58a6e12d1e51355f9c5b9c3/add-auth0-recipe.mdxThe nice thing about using recipes, is all you have to do is press enter a bunch of times and it’ll do all the work. Some of the stuff in this recipe includes creating a new page, installing the Auth0 npm package, adding a local plugin, and updating some Gatsby specific pages.
Once the recipe is finished, let’s talk about the code that was added.
What gets added?
root package.json
The latest version of the Auth0 SPA SDK is added: @auth0/auth0-spa-js
A new local plugin
The following files are added to a local plugin:
auth.jspackage.jsonindex.jsgatsby-browser.js
The auth.js file holds mostly what you’ll find in the quick-start react guide for Auth0. This file does the following:
- Create a new React context
export const Auth0Context = React.createContext(defaultContext)- Initalize the Auth0 client
const auth0FromHook = await createAuth0Client(initOptions)- Create state values of the Auth0 client
const [isAuthenticated, setIsAuthenticated] = useState()
const [user, setUser] = useState()
const [auth0Client, setAuth0] = useState({})
const [loading, setLoading] = useState(true)
const [popupOpen, setPopupOpen] = useState(false)- export a custom
useAuth0hook with state and functions
export const useAuth0 = () => useContext(Auth0Context)Now whenever we want to use the Auth0 SDK or state values, we just need to import it into any component we want.
The index.js page within the local plugin is just importing and exporting this hook:
import { useAuth0 } from './auth'
export { useAuth0 }
The package.json is required for our plugin however we can just leave it empty
{}
And finally, we add a new gatsby-browser.js file. Here we export wrapRootElement which Gatsby looks for when initializing our app.
import React from 'react'
import { Auth0Provider } from './auth'
import { navigate } from 'gatsby'

const onRedirectCallback = appState =>
  appState && appState.targetUrl && navigate(appState.targetUrl)

export const wrapRootElement = ({ element }, pluginOptions) => {
  return (
    <Auth0Provider
      domain={pluginOptions.domain}
      client_id={pluginOptions.clientId}
      redirect_uri={window.location.origin}
      onRedirectCallback={onRedirectCallback}
    >
      {element}
    </Auth0Provider>
  )
}
Notice how we import the provider we set up in the auth.js file. Also, we wrap element which is the root component within our app. This is the magic sauce for our custom hook. With our entire app wrapped in this provider, we can use our hook anywhere and the state stays consistent.
In order for Auth0 to work in our app, we have to tell Auth0 which app this is to enforce certain security measures. The way that we do that is by setting a domain and clientId. Notice in the <Auth0Provider /> component that we pass these values from pluginOptions:
domain={pluginOptions.domain}
client_id={pluginOptions.clientId}
These “options” come from the root gatsby-config.json file:
Root gatsby-config.json
This code was added with the recipe:
    {
      resolve: "gatsby-plugin-auth0",
      options: {
        domain: "dev-56co2w2u.auth0.com",
        clientId: "z9q0NYIVQlhiQ1qkWPscJ3kELX8zH1wn",
      },
    },
We need to update the domain and the clientId with values from our personal Auth0 account. In order to find these values:
- Login or signup for Auth0
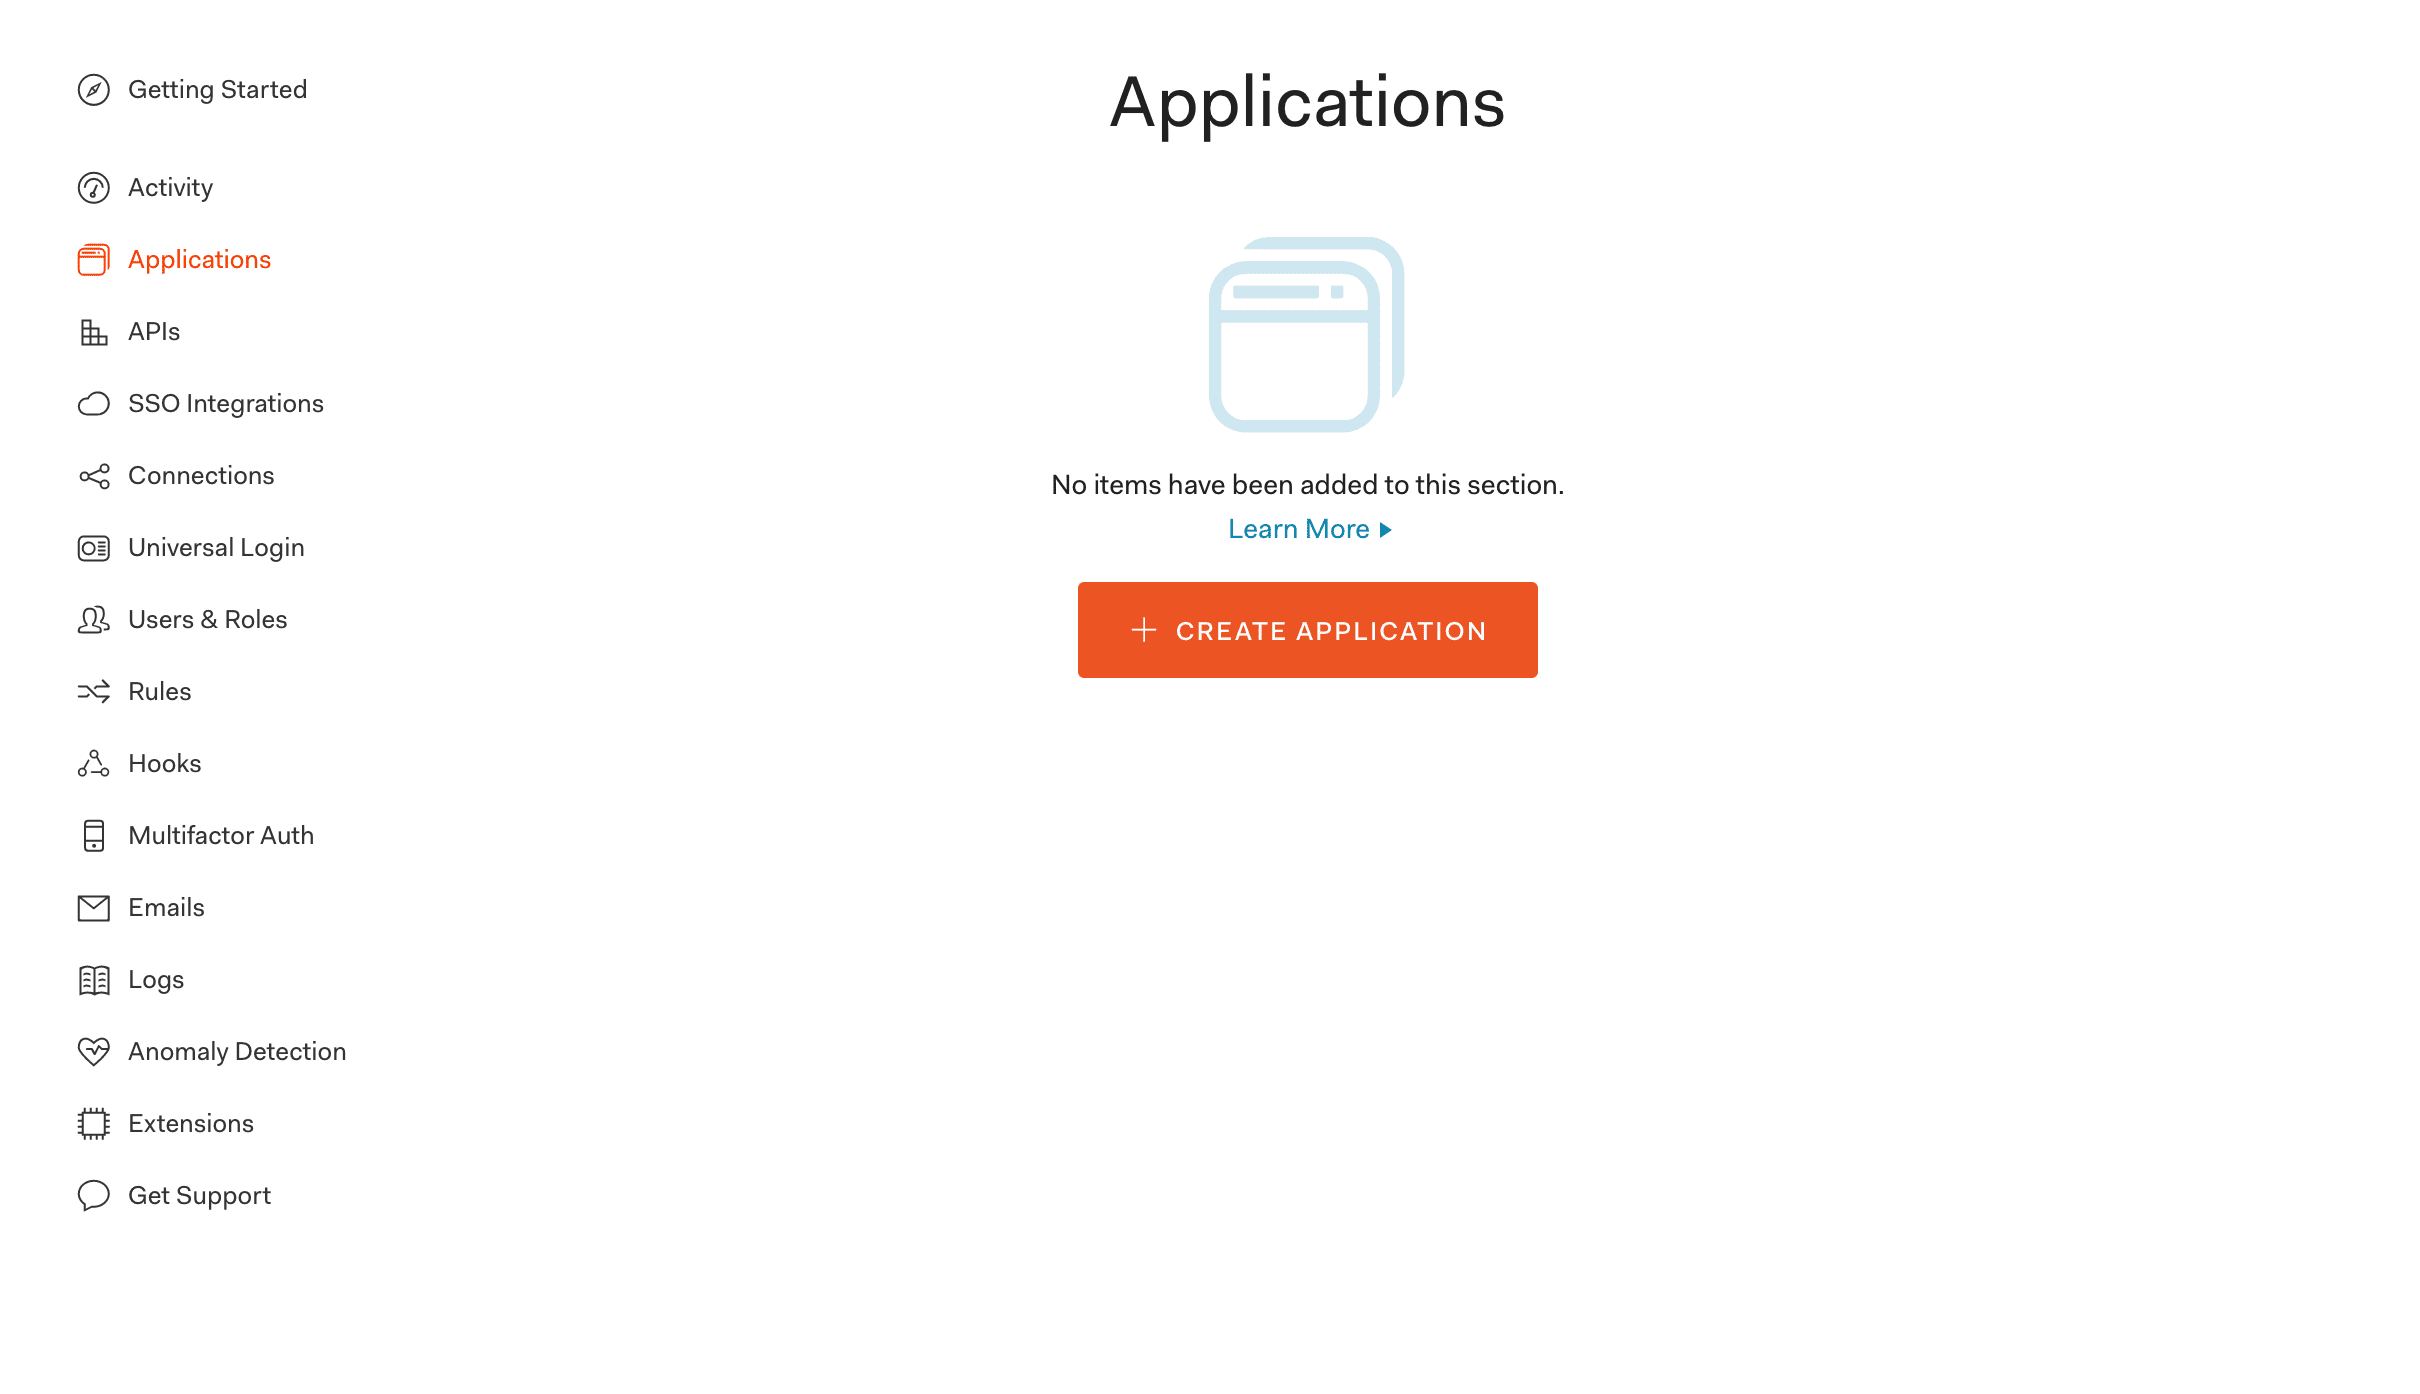
- After logging in you’ll be on
manage.auth0.com/dashboard/. Look in the left navigation for “Applications” - Click the orange button that says “CREATE APPLICATION”
In the next view, give your app a good name and click on “Single Page Web App”.
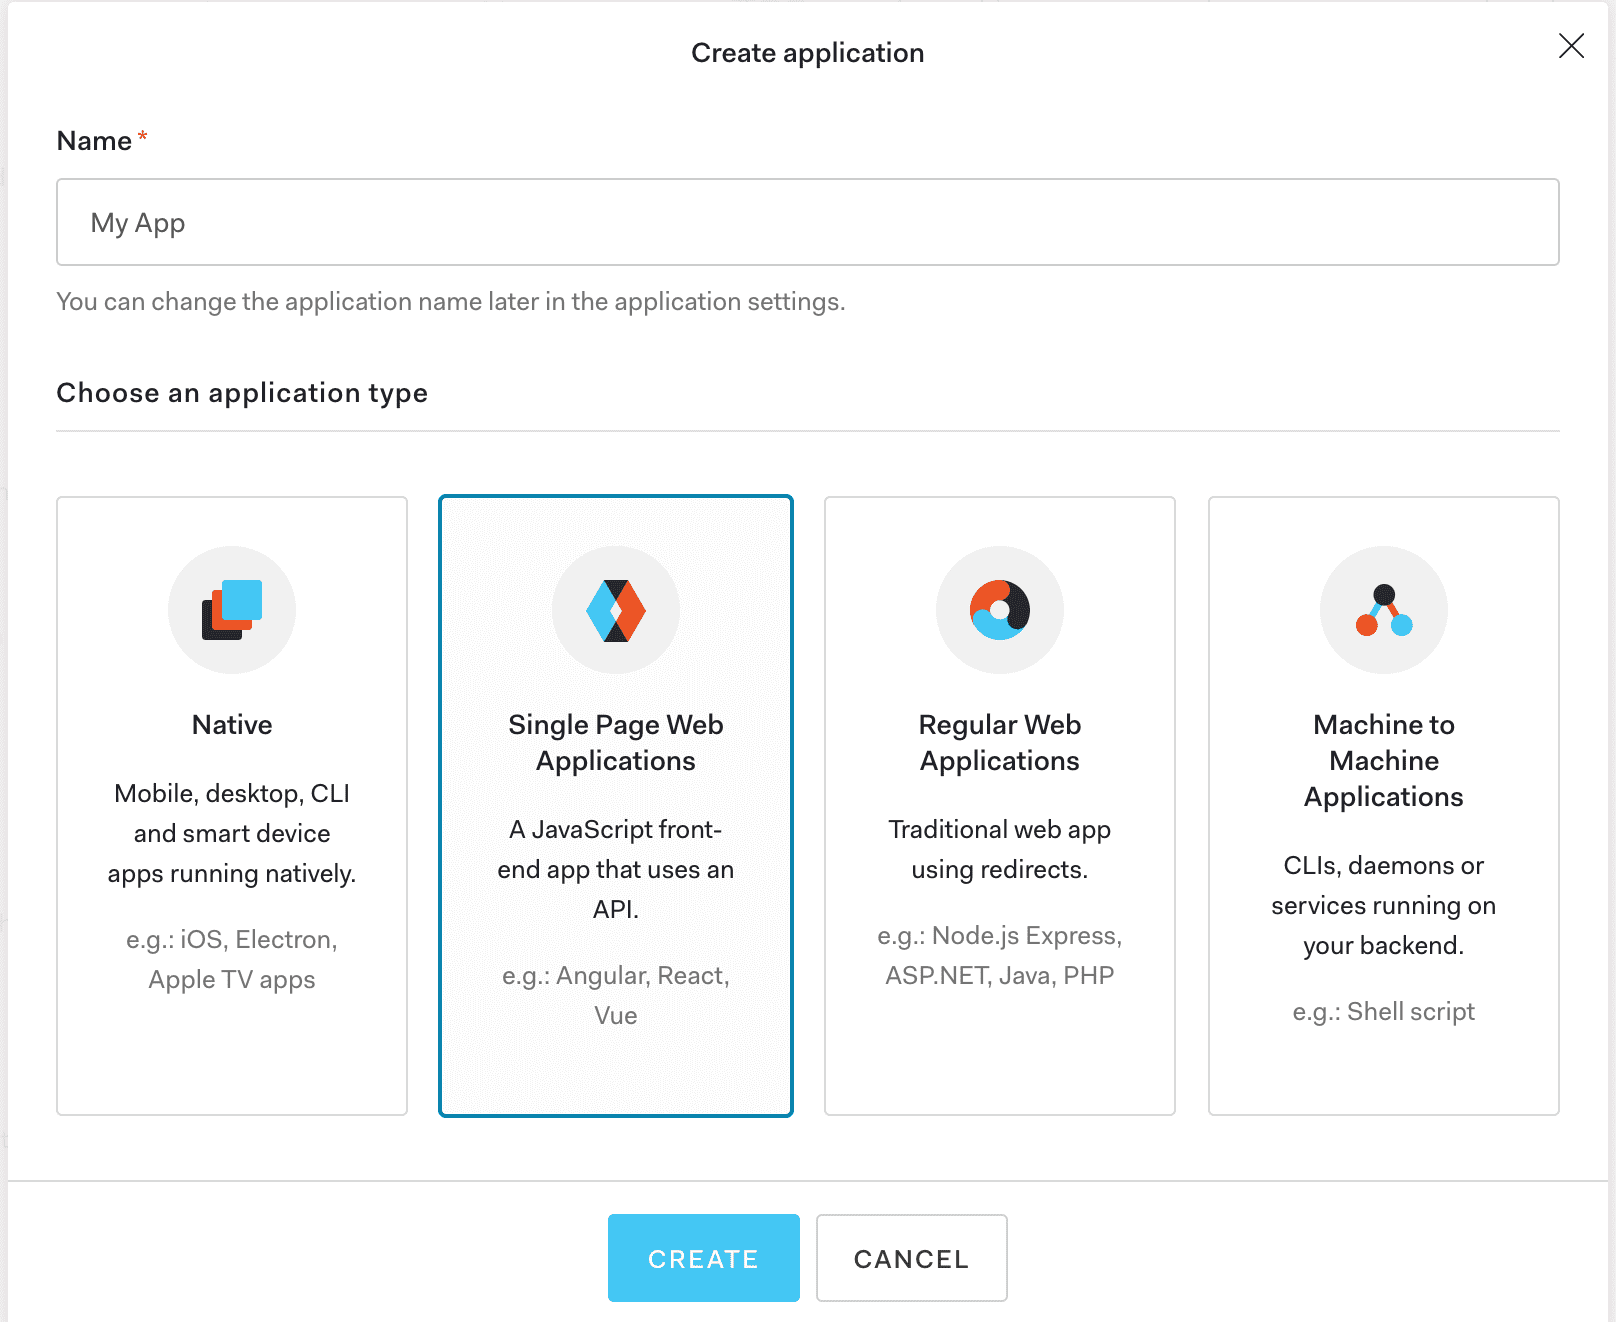
After that it’ll take you to the “Quick Start” tab. Click on the adjacent “Settings” tab. Here we find the two values we need to copy and paste back in our gatsby-config.json file.

Once you’ve copied over those two values, we need to add our domain to three sections.
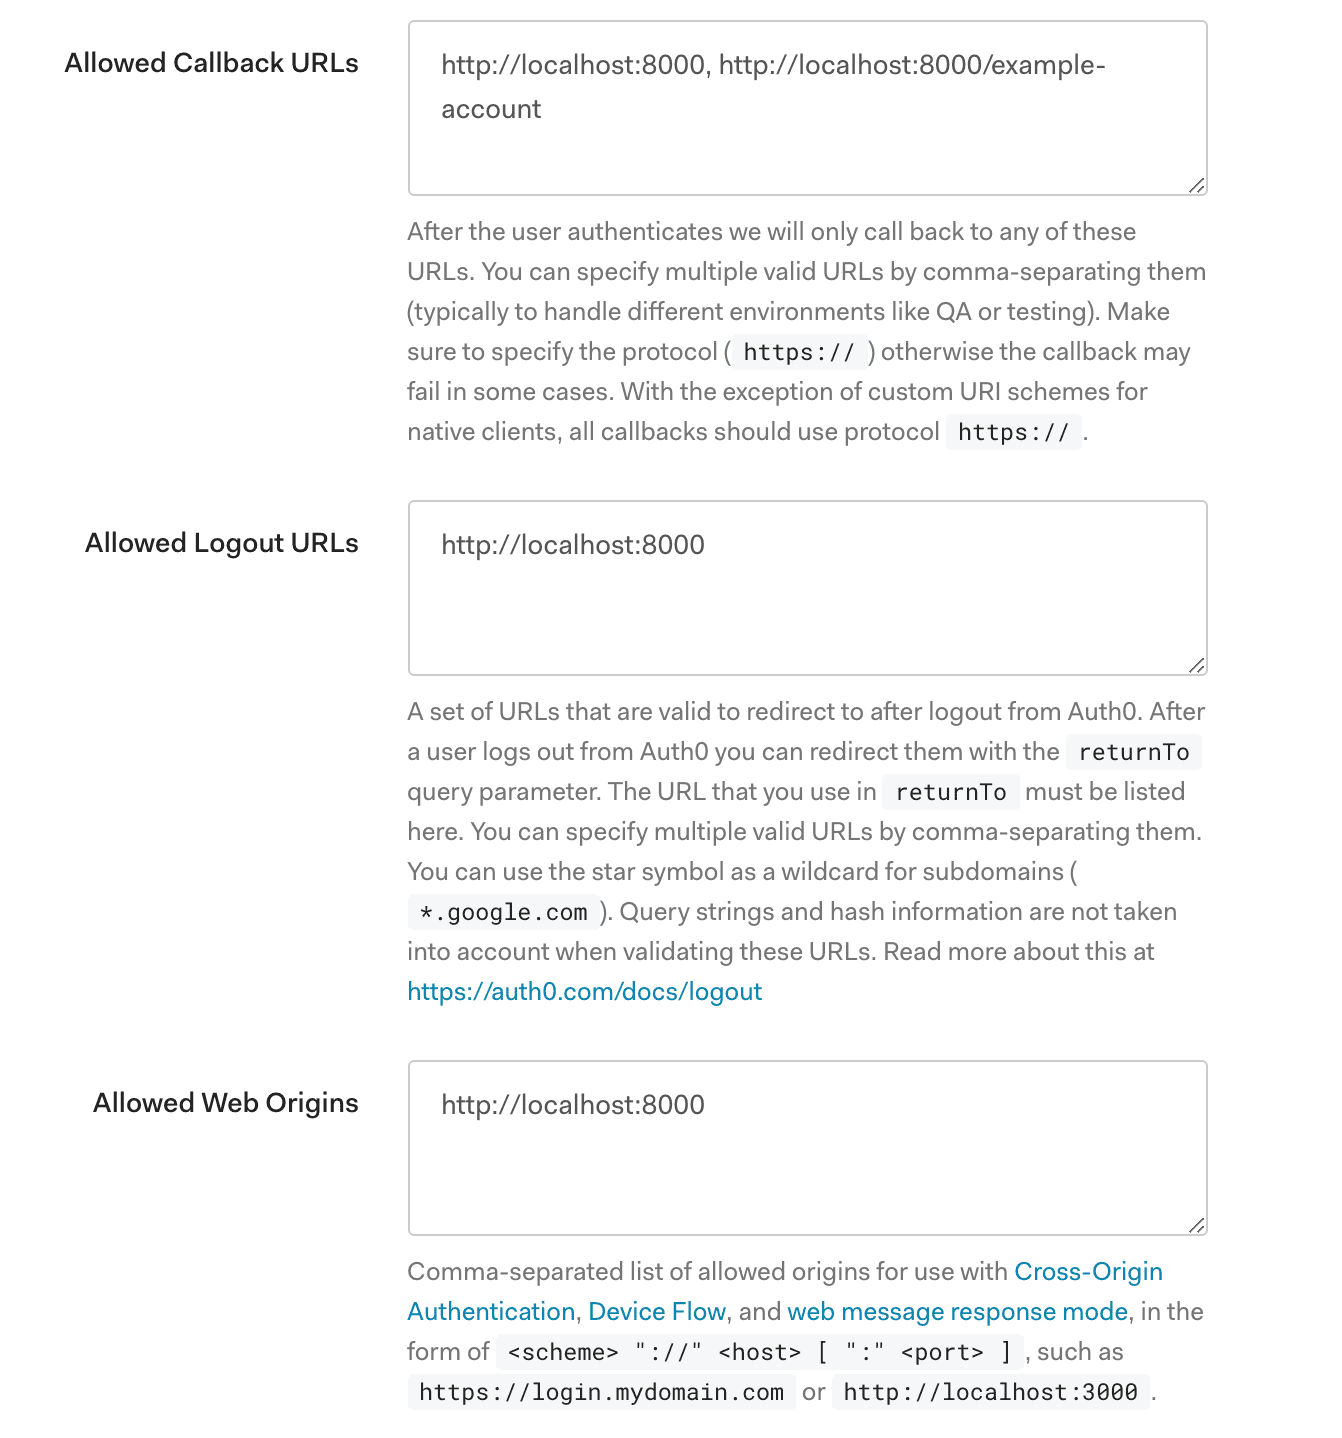
- Allowed Callback URLs: Which specifies the URLs that are allowed to redirect to after authenticating
- Allowed Logout URLs: Which specifies the URLs that are allowed to redirect to after logging out
- Allowed Web Origins: After authenticating, if the user refreshes the page, we want to check for any existing sessions automatically.
example-account.js
The recipe also added a new page under the pages folder.
import React from 'react'
import { useAuth0 } from '../../plugins/gatsby-plugin-auth0'

const Account = () => {
  const { isAuthenticated, loading, logout, user, loginWithPopup } = useAuth0()
  if (loading) {
    return <p>Loading...</p>
  }

  return (
    <div>
      {isAuthenticated ? (
        <>
          <button onClick={() => logout()}>Log out</button>
          <p>Check out the user data supplied by Auth0, below:</p>
          <pre>{isAuthenticated && JSON.stringify(user, null, 2)}</pre>
        </>
      ) : (
        <>
          <h2>Hi, try logging in:</h2>
          <button onClick={() => loginWithPopup()}>Log in</button>
        </>
      )}
    </div>
  )
}

export default Account
This is how you can instantly check to see if everything is set up correctly. Simply pressing the login button should create a pop up login with Auth0. After authenticating, you’ll see this example page refresh with the user object supplied by Auth0. There is also an option to log out.

These are just a couple of the features that come with the SDK. I suggest trying others that can be destructured off the custom useAuth0 hook:
...
isAuthenticated,
user,
loading,
popupOpen,
loginWithPopup,
handleRedirectCallback,
getIdTokenClaims: (...p) => auth0Client.getIdTokenClaims(...p),
loginWithRedirect: (...p) => auth0Client.loginWithRedirect(...p),
getTokenSilently: (...p) => auth0Client.getTokenSilently(...p),
getTokenWithPopup: (...p) => auth0Client.getTokenWithPopup(...p),
logout: (...p) => auth0Client.logout(...p),
...
Additional Resources:
Related Posts

I send out a newsletter... occasionally 🙂
If you like my content then you can sign up to be notified of upcoming stuff first. Most of my letters will be centered around frontend stuff, i.e JavaScript, CSS, React, testing stuff.. Though I'm also passionate about some soft skill stuff, interviews, SQL, and other backendy things.
No spam, I won't sell your info, and you can unsubscribe at any time.